Windows 10 ships with many privacy settings, one of which is, controlling the ability of apps to take a screenshots. In this post, we will show you how to allow or prevent apps from taking screenshots in Windows 10.
Allow or prevent apps from taking screenshots
We can allow or prevent apps from taking screenshots in Windows 10 in either of two quick and easy methods. We’ll explore this topic under the methods outlined below in this section.
Allow or prevent apps from taking screenshots via Settings app

Note: Depending on the version of Windows 10 you’re currently running, this option may not be available for you; in which case, do the registry method below.
To allow or prevent apps from taking screenshots via Settings app in Windows 10, do the following:
- Press the Windows key + I to open Settings.
- Click Privacy.
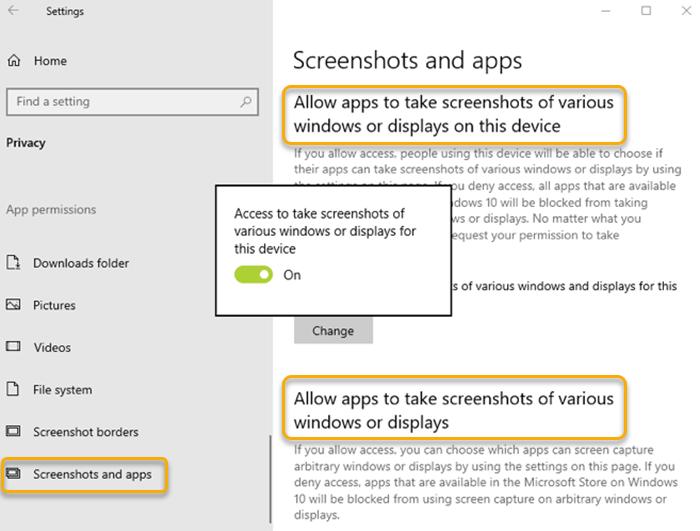
- On the left pane, scroll down and click Screenshots and apps.
- On the right pane, under Screenshots and apps, click on Change button.
- On the pop-up that appears, you can toggle On or Off the Access to take screenshots of various windows or displays for this device option.
By default, the option is On and it means apps can take screenshots. If you set it to Off, apps will not be able to take screenshots on your Windows device.
If you want to block only Desktop apps to take screenshot, scroll down in that window. Set the option Allow desktop apps to take screenshots of various windows or displays to Off.
- You can exit Settings app. The changes takes effect immediately.
Allow or prevent apps from taking screenshots via Registry

Since this is a registry operation, it is recommended that you back up the registry or create a system restore point as necessary precautionary measures. Once done, you can proceed as follows:
- Press Windows key + R to invoke the Run dialog.
- In the Run dialog box, type regedit and hit Enter to open Registry Editor.
- Navigate or jump to the registry key path below:
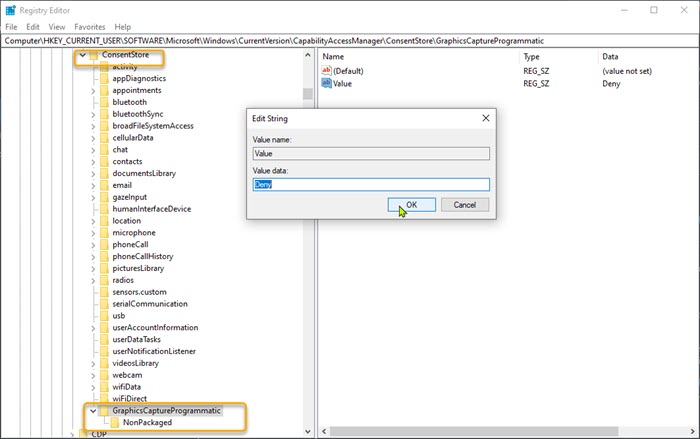
HKEY_CURRENT_USER\SOFTWARE\Microsoft\Windows\CurrentVersion\CapabilityAccessManager\ConsentStore
- At the location, right-click ContentStore on the left navigation pane and select New > Key.
- Rename the subkey as GraphicsCaptureProgrammatic and hit Enter.
- Now, click the new subkey and at the right pane, right-click on the blank space and then select New > String Value.
- Rename the key as Value and hit Enter.
- Double-click on the new key to edit its properties.
- Set its Value data to Deny to block apps to take screenshot.
If you want to block only Desktop apps to take screenshot, do the following:
- Right-click GraphicsCaptureProgrammatic on the left navigation pane and select New > Key.
- Rename the subkey as NonPackaged and hit Enter.
- Now, click the new subkey and at the right pane, right-click on the blank space and then select New > String Value.
- Rename the key as Value and hit Enter.
- Double-click on the new key to edit its properties.
- Set its Value data to Deny to block Desktop apps from taking screenshots.
- Exit Registry Editor.
- Restart computer.
That’s it!
