
In Task Manager, some users may discover that Microsoft Compatibility Telemetry is using 50% or more of the disk usage. In today’s post, we will show you how to disable Microsoft Compatibility Telemetry on Windows 10.
What is Microsoft Compatibility Telemetry?
Microsoft Compatibility Telemetry is a service in Windows operating system which contains technical data about the how the Windows devices and its related software is working and send this data periodically to Microsoft so as to enhance the user experience by fixing the potential issues that occur.
It is part of Windows 7, 8 and Windows 10, so it is a safe process even though it causes high CPU usage issue reported by a lot of users.
If the MCT process has recently started causing very high disk usage on your Windows 10 system, you can follow the instructions below to solve the issue by disabling this service.
Disable Microsoft Compatibility Telemetry on Windows 10
High CPU usage by a single process will slow down your computer inevitably and it will also have a negative impact on other processes that your computer is trying to run.
Disabling Microsoft Compatibility Telemetry on Windows 10 can be done in three ways via:
1. Group Policy Editor
2. Registry Editor
3. Task Scheduler
Let’s take a look at the detailed steps involved in each procedure.
1] How to disable Microsoft Compatibility Telemetry on Windows 10 via Group Policy Editor

- Launch Local Group Policy Editor (gpedit.msc).
- Navigate to the following Group Policy setting:
Computer Configuration > Administrative Templates > Windows Components > Data Collection and Preview Builds
- On the right-hand side panel, click on the Data Collection and Preview Builds so that you can access the options menu.
- Under options, double-click Allow Telemetry to edit it’s properties.
- In the window, click Disabled.
- Click Apply > OK to make sure that the changes are made on your system.
2] How to disable Microsoft Compatibility Telemetry on Windows 10 via Registry Editor
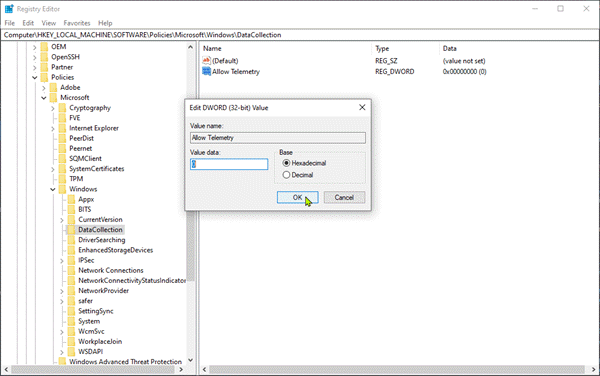
- Launch Registry Editor (regedit).
- Naviagte to the following registry key:
Computer > HKEY_LOCAL_MACHINE > Software > Policies > Microsoft > Windows > DataCollection
- On the right pane, right-click in the space and choose the option DWORD (32-bit) Value.
- Rename the new key as Allow Telemetry.
- Right-click it and choose Modify, and then set the value data to 0.
- Click OK to complete the change.
3] How to disable Microsoft Compatibility Telemetry on Windows 10 via Task Scheduler

- Click Start and type task scheduler, then hit Enter to open the Task Scheduler.
- Navigate to the path below
Task Scheduler Library > Microsoft > Windows > Application Experience
- On the Application Experience folder, look for Microsoft Compatibility Appraiser.
- Right-click on it and select Disable.
- Confirm to complete the process.
That’s it!
