
If you’re a developer or enthusiast wanting to try out Windows 10X, then this post is for you. In this post, we will illustrate the steps required to successfully install Windows 10X emulator on a Windows 10 device. The new emulator is available for developers, but anyone can download it to get a sneak peek at some of the work that Microsoft has been making for the modern version of Windows 10 optimized for dual-screen devices.
The emulator for Windows 10X – the new version of Windows 10 designed for dual-screen and foldable devices that removes the legacy components which also introduces a new streamlined, consistent, and lightweight experience.
Before you begin, you’ll need to pre-check the software and hardware requirements needed to successfully install and run the Windows 10X emulator.
Software requirements
These are the software requirements to run Windows 10X:
- Windows 10 Pro, Enterprise, or Education (x64) build 19555 or later from the Windows Insider Program.
- Microsoft Hyper-V with GPU-PV for hardware-accelerated tasks.
Hardware requirements
These are the minimum hardware requirements:
- Processor: Intel processor with at least four cores with virtualization support.
- RAM: 8GB or more.
- Drive: 15GB to 20GB or more (SSD recommended).
- Graphics: Discrete video card with support for DirectX 11 and WDDM 2.4 graphics.
Note: The emulator is only supported on Intel processors. If you have a device using an AMD processor, it’s not going to work. Also, in addition to virtualization support, you have to make sure that hardware-assisted virtualization, Second Level Address Translation (SLAT), and Hardware-based Data Execution Prevention (DEP) are enabled on the MOBO’s Basic Input/Output System (BIOS) or Unified Extensible Firmware Interface (UEFI).
The emulator also requires at least a four-core processor. Although most modern devices will meet the minimum requirements, you can determine if you have enough cores from the Task Manager using the Ctrl + Shift + ESC keyboard shortcut and clicking the Performance tab.
The Windows 10X emulator uses technology currently on development – as such, you must install the latest preview build from the Fast ring. With that in mind, I’ll be presenting the Windows 10X installation procedure under the following sub-headings and in this particular order:
1. Installing Windows 10 preview
2. Checking and enabling Microsoft Hyper-V component
3. Installing Microsoft Emulator
4. Installing Windows 10X Emulator image
5. Starting Windows 10X Emulator
Now let’s delve into the detailed full process.
How to install Windows 10X emulator on Windows 10
1] Installing Windows 10 preview
Important: After the upgrade process, you may not be able to rollback, and the installation could also fail. It’s recommended to use a spare computer or create a full system image backup before proceeding.
To install the latest Windows 10 preview build, do the following:
- Open Settings (Press Windows key + I).
- Click on Update & Security.
- Click on Windows Insider Program.
- Click the Get started button.

- Click the Link an account button.

- Select your Microsoft account from the list (or use a different account).
- Click the Continue button.

- In the “Pick your Insider settings” section, select the Fast option.
- Click the Confirm button.

- Click the Confirm button again.

- Restart your device.
On boot, open Settings > Update & Security > Windows Update > Check for updates.
- Click the Restart now button.
Once you complete the steps, the latest preview build available in the Fast ring will install on your computer so you can be able to install the Windows 10X Emulator Image from the Microsoft Store.
2] Checking and enabling Microsoft Hyper-V component
Essentially, Hyper-V is a virtualization technology available on Windows 10 Pro, Enterprise, and Education, and it allows you to create virtual machines to install and run different OSes on the same physical hardware. However, it’s also the technology that enables you to run the Windows 10X emulator.
Checking Hyper-V support

To confirm that your computer has the required Hyper-V support, do the following:
- Launch Command Prompt (Click Start and then type CMD and hit Enter).
- Type the the command below and hit Enter:
systeminfo.exe
Under the “Hyper-V Requirements” section, if the result reads Yes, then you can run Hyper-V. If the command displays No under Hyper-V Requirements, then your hardware doesn’t support this feature, or you need to make sure to enable it manually.
Enabling Hyper-V support
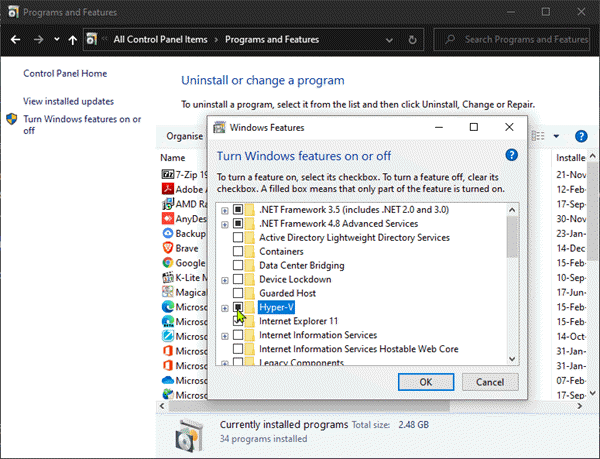
To enable Hyper-V on Windows 10, do the following:
- Launch Control Panel (Press Windows key + R and type control and hit Enter).
- Click Programs and Features.
- Click the Turn Windows features on or off option.
- Check the Hyper-V option.
- Click the OK button.
- Click the Restart now button.
After you complete the steps, you can proceed with the steps to download and install the Microsoft Emulator and Windows 10X testing image.
3] Installing Microsoft Emulator
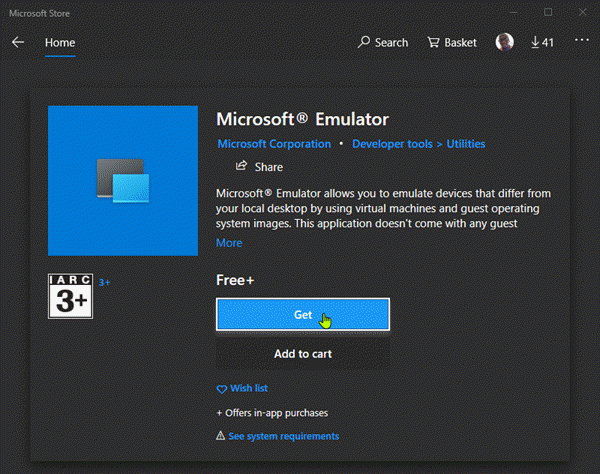
To install the Microsoft Emulator on Windows 10, do the following:
- Launch Windows Store.
- Search for Microsoft Emulator.
- Select the application from the search result.
- Click the Get (or Install) button.
Once you complete the steps, the emulator will install on your computer, and you can now finally proceed to download and install the Windows 10X emulator image.
4] Installing Windows 10X Emulator image

To install the Windows 10X Emulator image, use these steps:
- Launch Windows Store.
- Search for Windows 10X Emulator Image.
- Select the application from the search result.
- Click the Get (or Install) button.
After you complete the steps, the Windows 10X testing image will install on your computer, and the Microsoft Emulator will detect it automatically. You can then proceed to start the Windows 10X emulator.
5] Starting Windows 10X Emulator

To get started with the Windows 10X Emulator, do the following:
- Click Start.
- Search for Microsoft Emulator and click the top result to open the app.
- Click the Start button.
If you get the “XDE:019, You do not have permission to run the emulator” warning, click the Retry button to continue.
- Use the controllers on the right side to rotate, navigate, take screenshots, control volume, and turn off the emulator.
This Microsoft documentation provides more information about Windows 10X.
