
In today’s post, we will present and understand the symptoms, identify the root cause and then provide the resolution to the error where Sysprep fails after you remove or update Windows Store apps that are included in the built-in Windows 10 image.
Sysprep (System Preparation Tool) is a tool for IT administrators who want to prepare the installation of Windows for duplication, auditing, and customer delivery. The guidance in this article is intended for use by support agents and IT professionals. For home users having issues while using Windows Store apps, we suggest you try the Windows Store Apps Troubleshooter.
A fatal error occurred while trying to sysprep the machine

We present the symptoms of this issue based on the following scenarios:
Scenario 1
a. You are creating a custom Windows 10 or Windows 8 reference computer that you want to sysprep and capture.
b. You want to remove some of the provisioned Microsoft Store apps (Appx packages) from this reference computer.
c. You run the command:
dism -online /Remove-ProvisionedAppxPackage /PackageName:<packagename> to deprovision the Appx packages
When you run sysprep operation in this scenario, the operation may fail with the following error:
System Preparation Tool 3.14
A fatal error occurred while trying to sysprep the machine
Scenario 2
a. You have an existing Windows image, and several Microsoft Store apps are side-loaded in the image.
b. You want to remove some of the side-loaded Appx packages from your image and customize it further.
c. You boot into the reference computer and run one of the following PowerShell commands to remove the provisioning of the Appx package:
Remove-AppxProvisionedPackage –PackageName <PackageName>
Remove-ProvisionedAppxPackage –PackageName <PackageName>
In this scenario when you run Sysprep operation, you get the same error message as in scenario 1.
Scenario 3
a. You are creating a Windows 10 or Windows 8 reference image.
b. You connect to the Windows 10 or Windows 8 Store, and then you update the built-in Windows Store apps by using the Windows Store.
Also, in this scenario when you run Sysprep operation, you get the same error message as in scenario 1.
Next, we identify the cause of the Windows 10 machine Sysprep error.
Cause of A fatal error occurred while trying to sysprep the machine
The cause of this error could be either of the following:
1] There is a limit to how many times you can use the sysprep tool. Once you have exceeded the limit, the next time you run the tool, you will be prompted with the error. The limit is three.
OR
2] Sysprep has an additional provider that’s added in Windows 10 and Windows 8 to clean Appx packages and to generalize the image. The provider works only if the Appx package is a per-user package or an all-user provisioned package.
- Per-user package means that the Appx package is installed for a particular user account and is not available for other users of the computer.
- All-user package means that the Appx has been provisioned into the image so that all users who use this image can access the app.
If an all-user package that’s provisioned into the image was manually de-provisioned from the image but not removed for a particular user, the provider will encounter an error while cleaning out this package during sysprep. The provider will also fail if an all-user package that’s provisioned into the image was updated by one of the users on this reference computer.
Now, let’s look at the solution for the Windows 10 machine Sysprep error.
How to fix “A fatal error occurred while trying to sysprep the machine” in Windows 10
The resolution for this error depends on if the error is triggered by the first cause or the second.
If the error is prompted by the first cause, then you can try the following:
1] Edit SkipRearm Key
This requires you perform a registry tweak. So, first, you should back up the registry or create a system restore point in case the procedure goes south.
Once you have done either of the actions, you can now begin as follows;
Locate and then click the following registry key:
HKEY_LOCAL_MACHINE\SOFTWARE\Microsoft\Windows NT\CurrentVersion\SoftwareProtectionPlatform\
In the right-hand side pane, locate SkipRearm key and double-click it to edit its properties.
Change its value data to 1 and click OK.
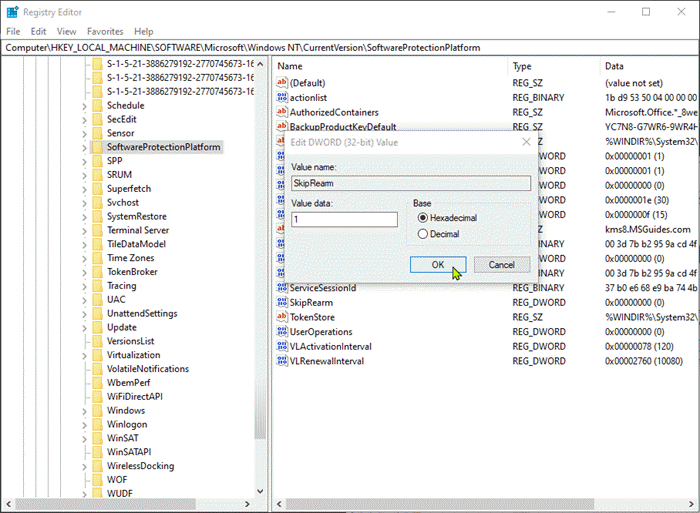
Exit Registry and restart PC for changes to take effect.
2] Edit GeneralizationState and CleanupState Key
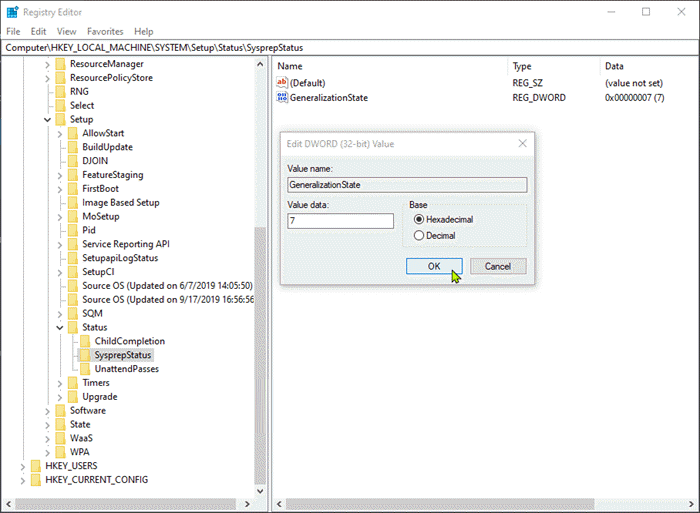
Launch Registry Editor.
Locate and then click the following registry key:
HKEY_LOCAL_MACHINE\SYSTEM\Setup\Status\SysprepStatus
Double-click the GeneralizationState key.
Change the value to 7 and click OK.
Next, double-click the CleanupState key and set the value to 2.
Click OK.
If there’s no CleanupState key, don’t worry, just edit the GeneralizationState key.
Restart PC for changes to take effect and then run sysprep again.
3] Uninstall MSDTC
MSDTC is an acronym for Microsoft Distributed Transaction Coordinator. As the name says, MSDTC is a Windows service providing transaction infrastructure for distributed systems.
This solution requires you uninstall MSDTC and then reinstall it. Here’s how:
Launch Command Prompt in elevated mode.
To uninstall, type in the command below and hit Enter.
msdtc -uninstall
Now, to reinstall, type in the command below and hit Enter.
msdtc -install
Restart PC for changes to take effect and then run sysprep again.
However, if the error is prompted by the second cause, you’ll need to remove the package for the user who’s running sysprep, and also remove the provisioning.
Here’s how:
To begin, first, unplug the Internet connection or disable Automatic Updates in Audit mode before you create the image, to prevent Windows Store from updating apps.
Now, do the following in this sequence:
1. Run the command:
Import-Module Appx PowerShell cmdlet
2. Run the command:
Import-Module Dism
3. Run the command:
Get-AppxPackage -AllUser | Where PublisherId -eq 8wekyb3d8bbwe | Format-List -Property PackageFullName,PackageUserInformation
In the output of this last cmdlet, check the users for whom the package is showing up as Installed. Delete these user accounts from the reference computer, or log on to the computer by using these user accounts. Then, run the cmdlet in step 4 to remove the Appx package.
This command lists all packages that were published by Microsoft and installed by any user of that reference computer. Because the computer is to be sysprepped, we assume that these user profiles no longer require the package.
If you have manually provisioned apps that belong to other publishers, run the following command to list them:
Get-AppxPackage -AllUser | Format-List -Property PackageFullName,PackageUserInformation
4. Run the command:
Remove-AppxPackage -Package <packagefullname>
5. Remove the provisioning by running the following cmdlet:
Remove-AppxProvisionedPackage -Online -PackageName <packagefullname>
If you try to recover from an update issue, you can reprovision the app after you follow these steps.
That’s it on how to successfully resolve this sysprep error!
